How to remove lens flare in Photoshop

How to remove lens flare in Photoshop

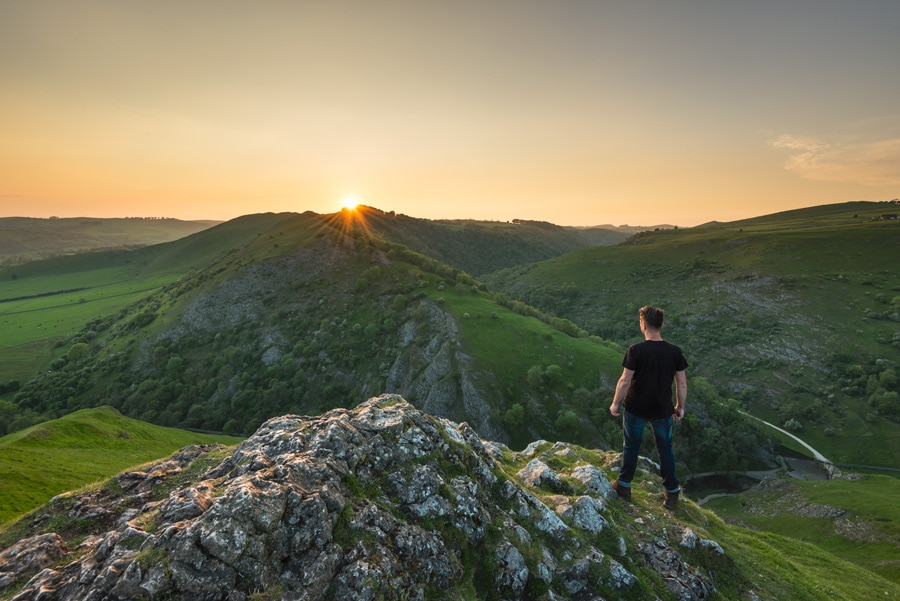
How many times have you shot a killer image at golden hour only to find it practically ruined by ugly lens flare? Learn how to quickly and easily remove lens flare from your landscape images in Photoshop. This is an essential technique for all photographers who often shoot landscapes and cityscapes at sunrise and sunset with the sun in the frame.

Read more

Create surreal motion blur in forest shots

Misty sunrise at Delemere Forest in Cheshire

Learn how to apply a surreal motion blur to forest shots in Photoshop. This technique is hugely popular and can be applied in just a few minutes. All you need is a forest image, ideally taken in interesting lighting conditions, and you’re ready to go.

Read more

Boost contrast without increasing saturation

How to boost contrast without increasing saturation in portraits

How to boost contrast without increasing saturation. Adjustment Layers in Photoshop are powerful tools, but sometimes using them at face value doesn’t provide the best results. In this tutorial we’ll take a look at how a simple change of Blending mode can make a huge difference to an Adjustment Layer.

Read more

Make your sunrise and sunset shots pop

How to enhance the colours in sunrise and sunset shots using Photoshop

Learn how to make your sunrise and sunset images pop with this simple colour enhancement technique. By using either natural colour sampled from the image or adding a similar tone selected from the Color Picker in Photoshop, you can make your golden hour shots even more eye-catching while maintaining a natural appearance. 

Read more

How to focus stack images in Photoshop

focus stacking landscape photography

Focus stacking is the perfect way to ensure your landscape shots are pin-sharp from the front of the image, all the way to the back. Learn how easy it is to blend focus stacked images together using Photoshop’s intelligent automated functions. This tutorial focuses on blending landscape images together in Photoshop, with a small amount of shooting advice.

Read more

Roach End Barn Location Guide

Roach End Barn, Peak District

Roach End Barn is a fantastic photography location found at the end of The Roaches on the Staffordshire side of the Peak District. The Roaches is a gritstone edge that is itself a great location for photography with subject matter perfectly positioned for shooting at both sunrise and sunset. This guide focuses on Roach End Barn, but will also get you to The Roaches if you would like to shoot here. 

Read more

Use blur and contrast to focus attention in portraits

Use blur and contrast to focus attention in portraits

Learn how to focus attention in portraits using a tilt & shift style of blur, and also how to create a high contrast, diffuse glow desaturation technique that produces a punchy colour and tone effect. You can apply the whole technique in Photoshop, or simple use one of the individual smaller effects used within the main technique – it’s entirely up to you.

Read more

Control colour luminosity in Photoshop

Control colour luminosity in Photoshop

Learn how to control colour luminosity/brightness with a Black & White Adjustment Layer in Photoshop. With this simple technique you can lighten or darken almost any colour in the image to achieve the perfect colour luminosity. The result is greater control over your images by increasing the impact of colour.

Read more

Shooting video for cinemagraphs

via GIPHY

Cinemagraphs have taken the Internet by storm and creating them is a simple process that requires a slightly different approach to shooting regular stills. Quite simply that you have to shoot video from which a still will be taken from during processing. In this part one tutorial you’ll be shown the basics of shooting video. If you would like to jump ahead and learn how to create a cinemagraph in Photoshop click here.

Read more

Create a cinemagraph in Photoshop

How to create a cinemagraph in Photoshop

Cinemagraphs are fun and surreal still images that display an element of movement. This is achieved by shooting a short amount of video footage, loading it into Photoshop, creating a still and then masking out selected areas to reveal the movement behind. By then saving the file as a GIF you have a cinemagraph. If you’d like to learn the basics of shooting video with your DSLR or mirrorless camera take a look at part one of this tutorial – shooting video for cinemagraphs – by clicking here.

Read more